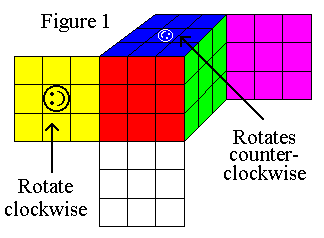
If this notation is still confusing, click on Figure 1 to see example figures demonstrating the move.
If your cube has a picture on each face or a logo in the center of each face, some extra moves are required to take care of this. The first step is to solve the cube using the directions given on the solution page, while simply ignoring the orientation of the centers. If you just have logos, this is simple since they're easy to ignore. If you have pictures, it's a bit harder since the centers are part of each picture and you'll need to look at them to help you determine how to position the corner pieces in step 1 and step 2. Still, use the centers as reference, but don't worry about their orientation until the cube is completely solved.
Once the cube is solved, the following moves can be used to rotate the middle-center pieces of specific sides. In order to describe these moves, I need to define two new moves in addition to the old ones. The new moves are used to describe rotations of the middle slices, both the horizontal slice between the top and bottom sides, and the vertical slice between the left and right sides.
Use the following move (or its reverse) to rotate each of the middle-center pieces that needs to be rotated by 90 degrees. Move 1 rotates the piece clockwise, while the Reverse of Move 1 rotates it counterclockwise. Also, since we're dealing with pictures/logos now, I will no longer use the "mirror" convention to show reflections of the hidden sides. Instead, I will display the hidden sides as "hinged" to their neighbors. Pretend that the sides are like doors mounted on hinges, and have swung open so that you can see them.
 |
Orient the cube as shown in Figure 1, placing the side with the piece that needs to be rotated on the left, then perform Move 1 to rotate the piece 90 degrees clockwise. |
| Move 1:
V-1 H-1 V U V-1 H V U-1 If this notation is still confusing, click on Figure 1 to see example figures demonstrating the move. | |
 |
 |
| For sides with whole pictures rather than just
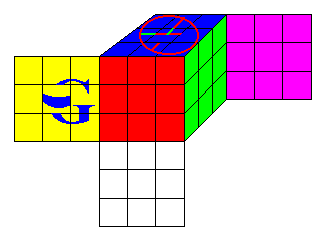
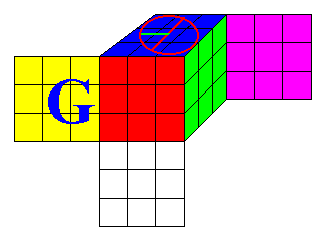
logos, the above two figures show views before and after Move 1. The left face has a blue G on it while the top face has a circle with a long red line and a short green line. | |
Note: To rotate the piece counterclockwise, reverse Move
1, giving:
Reverse of Move 1: U V-1 H-1 V
U-1 V-1 H V
Use the following move to rotate a single middle-center piece by 180 degrees. Applying Move 1 twice would not have the same effect as applying Move 2, since using Move 1 twice will rotate the top middle-center piece by 180 degrees, in addition to the left middle-center piece.
 |
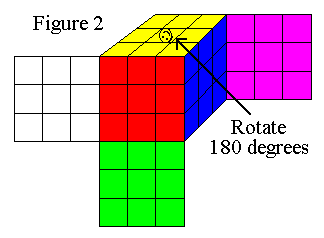
Orient the cube as shown in Figure 2, placing the side with the piece that needs to be rotated on the top, then perform Move 2 to rotate the piece 180 degrees. |
| Move 2: U R L U2 R-1 L-1 U R L U2
R-1 L-1 Notice that the second half of this move is simply the first six steps repeated again. Also, I've used the symbol R to represent the right hand side. | |
Back to the Rubik's cube solution page.
These pages are mirrored at http://www.alchemistmatt.com/ and http:/www.geocities.com/tandm_wy/.
Last Modified September 14, 2001